Jalapeno Jelly {a.k.a. Hot Pepper Jelly} Plus a Step-by-Step Canning TutorialMel, 2014-07-25 11:00 I’ll admit that the idea of jalapeno jelly was a

       
logo for mad mimi
facebook instagram pinterest

Jalapeno Jelly {a.k.a. Hot Pepper Jelly} Plus a Step-by-Step Canning Tutorial
Mel, 2014-07-25 11:00

Jalapeno Jelly

I’ll admit that the idea of jalapeno jelly was a little, well, interesting, when my Aunt Marilyn gave me one of her precious jars (she’s famous for this stuff). And if you are skeptical, too, I get it. I totally get it. But I’m telling you, you need to give this a chance. I am officially a skeptic no longer and I kind of want to convert the world to jalapeno jelly.

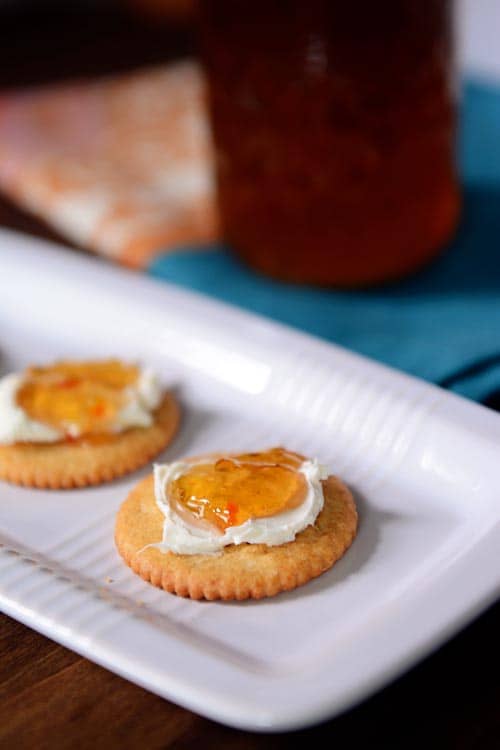
It is incredible. Sweet and spicy (the heat level is totally in your control), it is heavenly on crackers with a little dab of cream cheese. Heavenly, meaning: it’s kind of the best thing ever. (Or try softening a whole brick of cream cheese, spooning on the jalapeno jelly and going to town with crackers.)

Jalapeno Jelly

And if you think that’s good (I do, I do!), try it on a panini sandwich. The best sandwich I’ve ever had in my life (and trust me, I’ve eaten a lot of sandwiches; they are one of my favorite food options ever) is a turkey, swiss, bacon, avocado, tomato, jalapeno jelly sandwich. Made even yummier panini-style (pressed and heated until melty and delish). I’m making myself very, very hungry.

More? Try it as a dipping sauce with grilled chicken or steak or just dabbed on a crusty roll. The options really are endless. Jalapeno jelly is in the running for the yummiest stuff on earth. Plus, because it’s packed with intense flavors, a little dab’ll do ya. I’m not going to say a jar of it will last forever (we blazed through my Aunt’s jar in no time flat because I was anxious to try it on everything) but just know that a little goes a long way to get that sweet and spicy flavor.

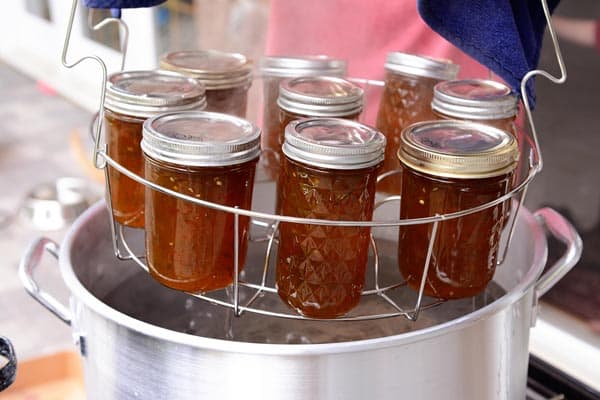
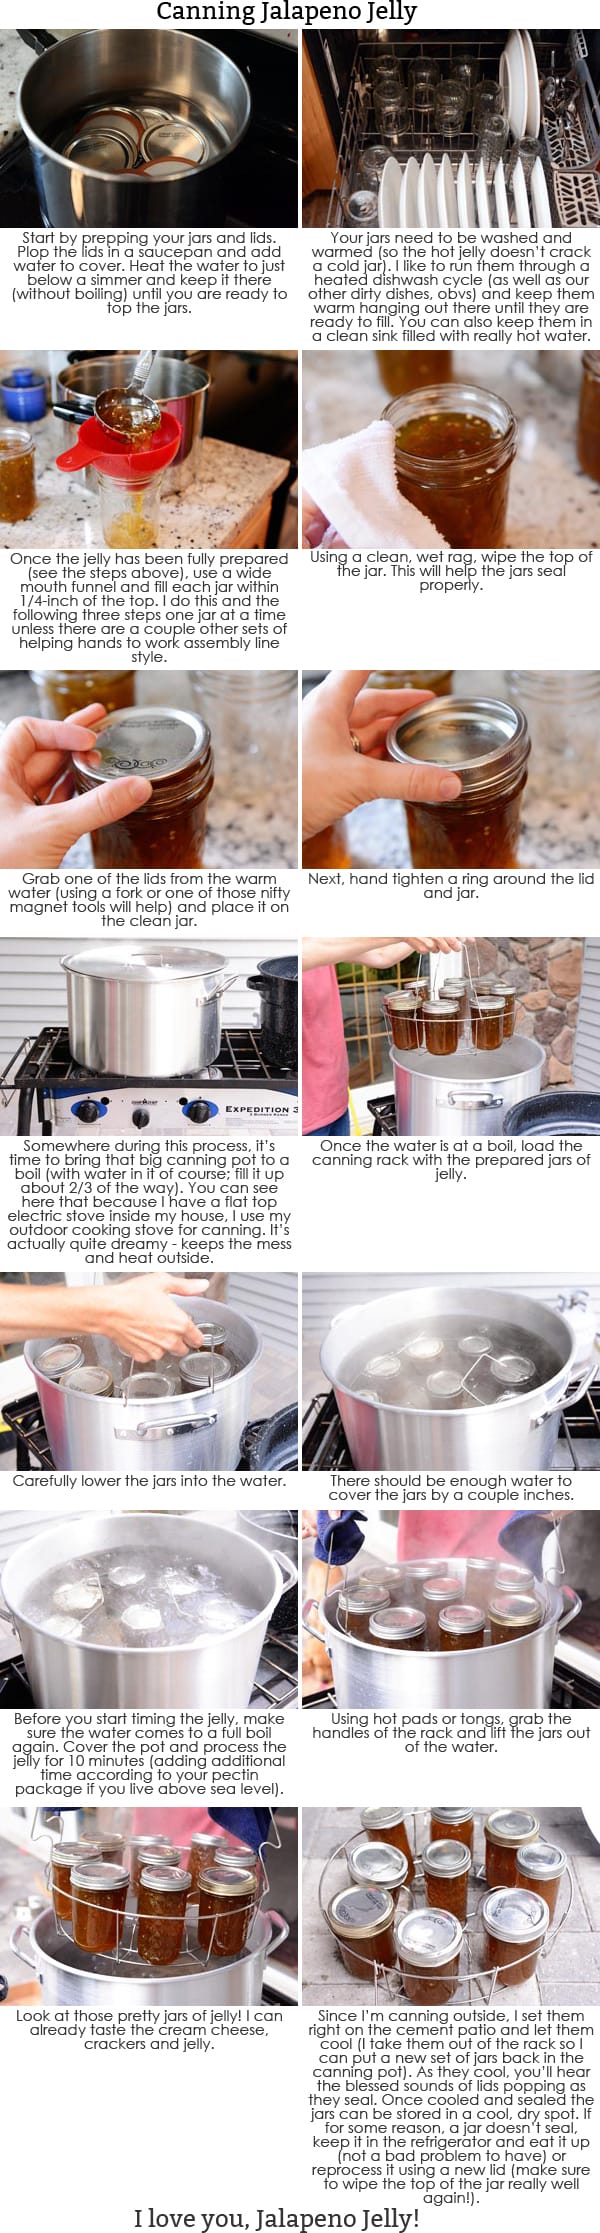
Last summer, I promised you more canning recipes/tutorials. Consider this one in the lineup of hopefully many more to come! Tis the season for canning, after all. Below is a helpful step-by-step guide on water bath canning. If you are new to the whole canning thing, the same basic process can be used with any bottled recipe that can be canned in a water bath instead of in a pressure canner (low-acid foods need to be pressure canned but high-acid foods are safely processed in a water bath). Canning can seem intimidating but I promise, it’s not hard. Check out this post on Water Bath Canning 101. It gives a great overview for the equipment you need to get started..

Jalapeno Jelly

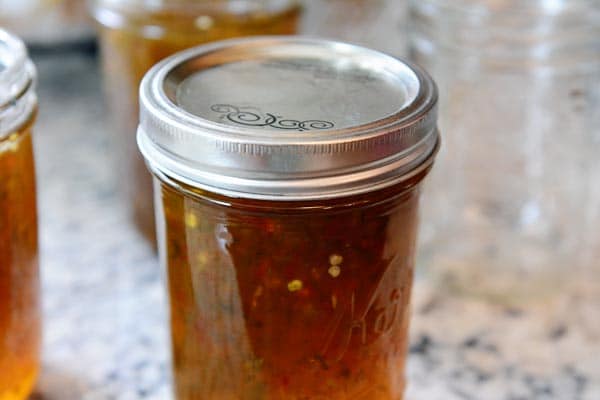
I know I’m kind of a nerd and all but when I was making this jalapeno jelly last weekend, I think the words “Canning is my life” actually came out of my mouth (and I even said it all alone out on my porch with no one to hear me…issues: I’ve got them). Hearing the little jars pop after they have sealed is like music to my ears and there’s just something really satisfying (like, pioneer satisfying) about canning your own food. So let’s get started!

A few tips on this jalapeno jelly:
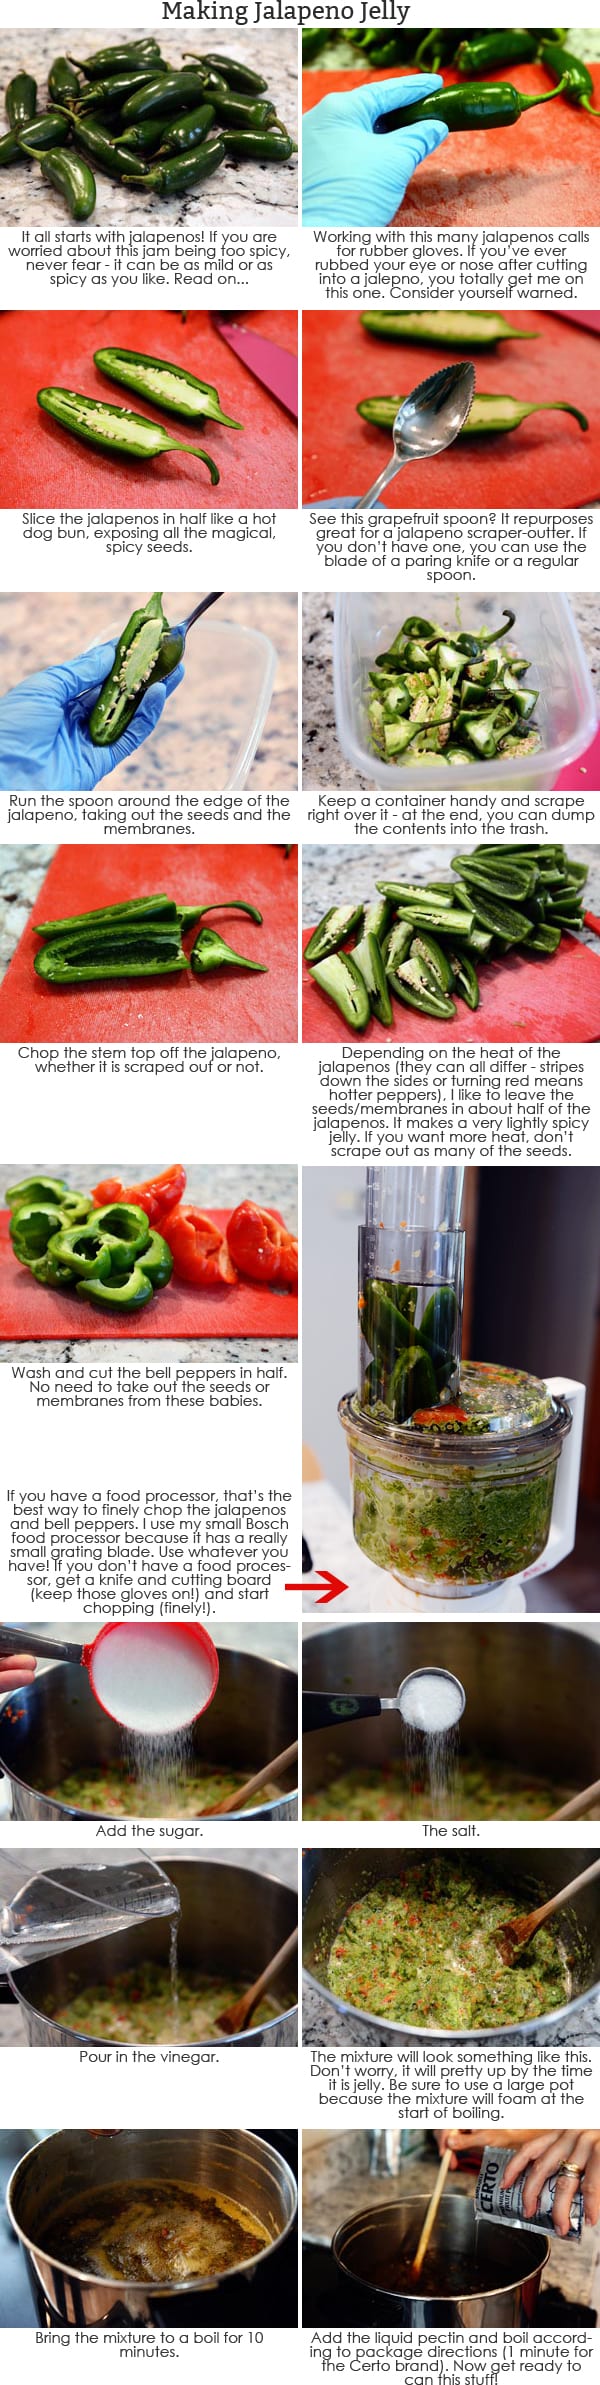
1) You can make it as spicy or mild as you want. Keep in mind: jalapenos that are starting to turn red or have brown spotty stripes down the sides are going to be hotter than others. For this batch, I kept the seeds in just less than half (I doubled the batch so out of 20 jalapenos, I left the seeds in about 8 of them; my jalapenos were pure green without any stripes or signs of red and after tasting the jelly, I’m wishing I would have left the seeds in at least half – the jelly is still delicious but I want a bit more heat so my recommendation would be to start with seeding half the jalapenos if they have no signs of stripes or redness).

2) The original recipe calls for six cups of sugar (it is jelly after all) but I think you could play around with the sugar and suggest 5-6 cups in the recipe. Taste as you go and add more sugar if you want it sweeter.

3) I talk about it in this post, but 99% of the time, I use Pomona’s pectin when canning fruit jams, jellies and syrups because you can get away with adding way, way, way less sugar than traditional pectins. But because this jalapeno jelly recipe relies on the sugar to give you that perfect blend of sweet and spicy, I stuck with the liquid pectin in my Aunt’s recipe. If you decide to experiment with Pomona’s or any other pectin, be sure and report back!

4) You’ll see from the step-by-step pictures below that I take no chances when working with this many spicy peppers and don rubber gloves to avoid the accidentally-rub-my-eye-hours-later-and-pay-the-price scenario. I encourage you to do the same so no one ends up howling in spicy pain.

Okie doke. Let’s get started. Oooh, boy, I’m excited. Aren’t you?

Jalapeno Jelly

Yield: Makes about 4 pint jars

Jalapeno Jelly

Ingredients

  • 1 large red bell pepper
  • 1 large green bell pepper
  • 10 jalapenos (see note)
  • 1 1/2 cups white vinegar
  • 1/2 teaspoon salt
  • 5-6 cups granulated sugar (see note)
  • 1 3-ounce pouch liquid fruit pectin (like Certo)

Directions

  1. Finely chop the bell peppers and jalapenos in a food processor fitted with a fine shredding blade (if you don't have a food processor, no worries, grab a knife and get started chopping up those peppers into little tiny pieces).
  2. Add the peppers to a large pot (the jelly will foam when it first comes to a boil so use a pot at least 5-6 quarts for a single batch and larger if doubling the batch).
  3. Stir in the vinegar, salt and sugar. Bring the mixture to a boil for 10 minutes, stirring often.
  4. Add the liquid pectin and boil for 1 more minute.
  5. Remove the pot from the heat. Pour the jelly to within 1/4-inch of the top of clean, warm canning jars. Wipe the rim of the jar with a damp rag. Place a lid and ring on each jar and process in a water bath canner for 10 minutes (you may need to add additional time if you live above sea level; the pectin box/info should give details).
  6. Once removed from the water bath canner, let the jelly rest for 1-2 days to let it fully set up.
http://www.melskitchencafe.com/jalapeno-jelly-and-a-canning-tutorial/
Recipe Source: from my Aunt Marilyn

Jalapeno Jelly

——————————————————————————————————————————–

Jalapeno Jelly

Giant Double Chocolate Cookie
Mel, 2014-07-23 11:00

Giant Double Chocolate Cookie

Heat schmeat. Summer schmummer. No-bake schmo-shmake (ok, that one doesn’t have quite the same ring to it).

Even though cookies may not be on your brain (they’re always on my brain but whatever) in the heat of summer, console yourself knowing that your oven only has to be on for 16 minutes max in order to partake of the goodness that lies within this giant double chocolate chip cookie. Bake one cookie; be happy forever…or so that old parable says.

I mean, just look at it.

Giant Double Chocolate Cookie

Compared to my scraggly, normal-sized chocolate chip cookie, it is enormous. Which is clearly not a bad thing when it comes to cookies. Based off of a popular recipe on my site (the classic giant cookie), this intensely chocolate version can be enjoyed any number of ways. 1) You can give it away as a gift (but why?), 2) you can cut it into slices like a little flat cookie pie (as seen below) or 3) you can break off pieces and enjoy tidbit by tidbit (until you realize you’ve eaten the entire giant chocolate cookie and wish you would have gone with #1).

Giant Double Chocolate Cookie

As much as I enjoy making giant cookies for our own eating pleasure, they make awesome gifts. For teachers. Neighbors. Acquaintances who get nailed in the eye with your child’s bad baseball aim. A million ways to give these as gifts and get us all one step closer to world peace (or at least neighborly peace). They fit beautifully on those cardboard cake circles (12-inch will do you just fine!); wrap a little twine around them and you’re done in enough time to whip up another one for yourself so it’s not awkward when you are weeping while handing the giant cookie gift over to your friend.

Giant Double Chocolate Cookie

One Year Ago: Double Cruncher Cookies with Fudge Filling
Two Years Ago: Chicken Caesar Salad Wraps
Three Years Ago: Curried Cauliflower “Popcorn”

Giant Double Chocolate Cookie

Yield: Makes 1 giant cookie

Giant Double Chocolate Cookie

This baked cookie should fit just about right on one of those 12-inch cardboard cake circles if you want to transport it or give it away!

Ingredients

  • 1/2 cup (8 tablespoons) butter
  • 1/2 cup semisweet or bittersweet chocolate chips
  • 1/2 cup granulated sugar
  • 1/2 cup lightly packed brown sugar
  • 1 large egg
  • 1 teaspoon vanilla
  • 1 cup all-purpose flour
  • 1/4 cup unsweetened cocoa
  • 1/4 teaspoon salt
  • 1/2 teaspoon baking soda
  • Extra chocolate chips, white chocolate chips or M&M's for sprinkling on top

Directions

  1. Preheat the oven to 350 degrees F.
  2. In a large microwave-safe bowl, combine the butter and chocolate chips. Microwave on 50% power for 1 minute. Stir and repeat 1-minute intervals until the chocolate and butter are melted and combined after stirring.
  3. Stir in the granulated and brown sugars. Then whisk in the egg and vanilla.
  4. In a separate medium bowl, whisk together the flour, cocoa, salt and soda. Stir the dry ingredients into the chocolate mixture until no dry streaks remain.
  5. Line a large, rimmed baking sheet (11X17-inch) with parchment paper or foil (grease if using foil) and press the cookie into about a 10-inch circle. The dough may seem a bit soft but that's ok. I gather the dough into a ball with my hands, transfer it to the baking sheet and press into a circle. If the dough is too soft to work with, refrigerate for 20-30 minutes.
  6. Top the cookie with chocolate chips or M&M's, pressing them lightly into the dough.
  7. Bake for 13-14 minutes. Don't overbake or the cookie will be a bit dry! Let the cookie cool completely on the baking sheet so it won't break upon transferring.
http://www.melskitchencafe.com/giant-double-chocolate-cookie/
Recipe Source: adapted from this giant cookie recipe

Chicken Curry in a Hurry
Mel, 2014-07-21 11:00

Chicken Curry in a Hurry

So, I have a dear friend here in my little town. Sujoo. I love her guts very much and not just because she makes some of the most killer Indian food I’ve ever eaten in my life. I can’t count the number of times I picked my kids up from school last year and she’d rush over to my car with a container of food she had made that day. Fresh paneer. Spicy Khara bread. Creamy dips. Spiced potato dumpling/fritters.  Gulab jamun. Palak paneer. And on and on. I’m powerless to resist Sujoo’s food and even more powerless to share with my family. Indian food hoarder. That’s me.

Chicken Curry in a Hurry

Well, this one day, I’m at Sujoo’s house learning her method for making ghee (clarified butter) and she asks me what my favorite kind of Indian food is and I start gushing: “oh my gosh, I just love curry, it’s my favorite Indian food everrrr.” Sujoo, too nice to tell me I was being a nincompoop, politely informs me that in India, there is no such thing as curry (the spice that we all keep in our spice cabinets). Instead, curry refers to a gravy or sauce not a flavor or spice. Thankfully this embarrassing experience was months and months ago, but did you know that? Am I late to the curry party? Do I need to get out more? I think I may have heard that important fact once upon a time but clearly forgot it (won’t happen again). I kind of lose my rational mind when it comes to curry.

Chicken Curry in a Hurry

My point? Well, this delicious curry in a hurry is probably not something my friend Sujoo would ever make since it doesn’t scream traditional Indian cuisine, but if you love the flavors of curry and want it quickly, this will definitely fit the bill. It’s simple. It’s lightened up. It’s really flavorful and super yummy. I’ll keep begging authentic Indian food from sweet Sujoo; but on my own, I’ll be making this dish over and over. It’s a perfect weeknight meal and a complete family pleaser (read: no complaining).

Truthfully, it’s so easy, I could pass off the dinner-making responsibilities to a few of my older kids while I lounge on the couch eating dark chocolate covered dried cranberries (modern day equivalent of bonbons) and watching Steel Magnolias, but that would make it much harder for me to snitch a piece or two of the tender chicken smothered in that fabulous curry sauce. And that just isn’t acceptable.

What To ServeNaan (need I say more; this stuff is divine)
Curried Cauliflower or Skillet Green Beans

One Year Ago: Teriyaki Chicken Stir-Fry {30-Minute Meal}
Two Years Ago: No-Bake Peanut Butter Chocolate Bars
Three Years Ago: Strawberry-Lime Cream Cake

Chicken Curry in a Hurry

Yield: Serves 4

Chicken Curry in a Hurry

Fresh ginger is really fantastic in this recipe - if you've never used it or don't know this great tip: buy a knob of ginger, cut it into 1-inch pieces (no need to peel), and freeze it. When you need it in a recipe, take a chunk out of the freezer and grate it on a rasp grater or the small holes of a box grater. Super easy!

Curry powders vary greatly in flavor and spiciness so make sure you use a curry powder you like. My very favorite curry powder is the Sweet Curry Powder from Penzey's. I use it almost exclusively whenever curry powder is called for. You can also substitute curry paste for the powder but start with less (about 1 teaspoon) and add more if you need it.

Ingredients

  • 1 teaspoon oil
  • 1 tablespoon grated ginger (see note)
  • 2 cloves garlic, finely minced or pressed
  • 2 teaspoons curry powder (see note)
  • 1/2 teaspoon ground coriander
  • 1/4 teaspoon ground cumin
  • 1 pound boneless, skinless chicken breasts or thighs, cut into bite-sized pieces
  • 1 can (13.6 ounce) lite coconut milk
  • 1/2 tablespoon light brown sugar
  • 1/2 tablespoon fish sauce
  • 1/4 teaspoon salt
  • 1/4 teaspoon black pepper
  • 1 tablespoon cornstarch (optional)
  • 1/4 - 1/2 cup chopped cilantro
  • Hot, cooked rice or quinoa for serving

Directions

  1. In a large, 12-inch nonstick skillet, heat the oil over medium heat until hot. Add the ginger and garlic and cook, stirring constantly, for about 30 seconds, until it starts to smell fragrant.
  2. Sprinkle in the curry powder, coriander and cumin. Cook for another 30 seconds, stirring to prevent burning.
  3. Add the chicken and cook until lightly browned, 2-3 minutes (it doesn't need to be cooked all the way through quite yet).
  4. Stir in the coconut milk, brown sugar, fish sauce, salt and pepper. Bring the mixture to a simmer. Cook for 4-5 minutes until the chicken is cooked through.
  5. If you would like the sauce a bit thicker, whisk together the cornstarch with 2 tablespoons cold water in a small bowl. Once combined, stir the mixture into the simmering curry. Simmer, stirring constantly, for a minute or so until the sauce thickens a bit.
  6. Stir in the cilantro. Season with additional salt and pepper to taste, if needed. Serve the curry over hot, cooked rice, quinoa or whatever else you might like (or it can be served on its own).
http://www.melskitchencafe.com/chicken-curry-in-a-hurry/
Recipe Source: adapted slightly from a recipe a lovely reader, Robin. A, sent me (it was a Weight Watchers recipe she tried and passed along) – I decreased the sugar and fish sauce, added cilantro, used curry powder instead of paste, added chicken
1px